Issue: When running Snooper Multi-Channel, you encounter a logon error.
Solution:
- The Windows user account that Snooper Multi-Channel runs under must have a password set.
- This is required by Windows security policies when running services under a personal user account.
- The Snooper service must be configured with the correct username and password in the Windows Services settings to ensure it can start properly.
Why is a Password Required?
When a Windows service is set to run under a specific user account, Windows enforces security rules to prevent unauthorized access.
- Accounts without passwords cannot run services in the background.
- This is a built-in Windows restriction to enhance security and prevent unauthorized system access.
Update the username/password in Snooper Channel controller program or use below instruction:
-
Set a Password for the Windows Account:
- Open Settings (
Win + I) → Accounts → Sign-in options - Ensure the user account has a password.
- Open Settings (
-
Update the Snooper Service Credentials:
- Press
Win + R, typeservices.msc, and press Enter. - Locate Snooper services in the list.
- Right-click → Properties → Log On tab.
- Enter the correct username and password of the Windows account.
- Click Apply, then OK.
- Restart the service.
- Press
This ensures that Snooper Multi-Channel services runs properly as Windows services without login errors.
Yes, Snooper incorporates a Speech-to-Text Plugin using OpenAI’s Whisper model, allowing it to transcribe recorded speech to text automatically. This feature requires an OpenAI API key.
Snooper offers several recording modes, including Sound/Voice activated mode, Dictation recording mode for continuous capture, Stealth mode for hidden operations, and a Recording scheduler for time-based recording tasks.
Yes, Snooper features a recording scheduler that allows users to start and stop recordings at predetermined times. This can be configured for one-time or recurring tasks, making it ideal for monitoring in various scenarios.
Snooper supports recording in MP3, WAV, and FLAC formats, with various settings for bit rate, sample rate, mono, or stereo recording, allowing for flexible audio quality and file size management.
Snooper offers post-recording features like automatic Zip-compression, PGP encryption, and the option to automatically send recordings via email, upload to Dropbox, or to an FTP server, ensuring secure storage and transmission of audio files.
Make sure you have the “Start recording in selected mode” option enabled. If you are running Snooper Pro as a service this setting should almost always be checked unless you are using the built-in scheduler of Snooper.

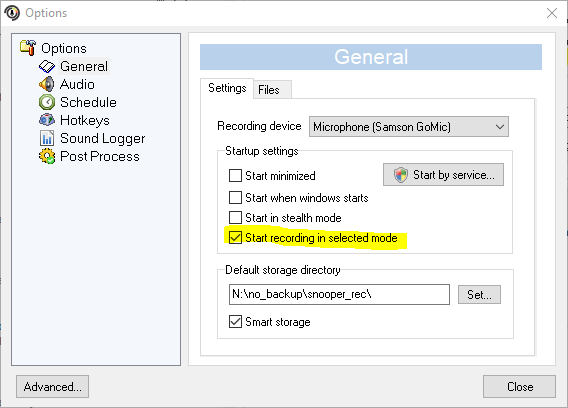
Start recording in selected mode option
Yes, Snooper supports remote monitoring and control via the MQTT plugin, which publishes various information about Snooper’s state to an MQTT broker. This enables remote management of recording states and real-time updates.
Yes, Snooper can operate in Stealth Mode or as a Windows service, making it invisible in the taskbar and system tray. In Windows 11, running Snooper as a service ensures it operates in the background, even when no user is logged in. However, Windows security policies may restrict microphone access when the screen is locked.
This feature is particularly useful for unattended recording, remote monitoring, or discreet audio capture.
Snooper has unique noise suppression systems and automatic gain control (AGC) to filter out unwanted signals and adjust the recording level, ensuring clear audio even in challenging environments.
In the mail settings use port 587. In the Advanced settings TLS must be enabled and SMTP authentication checked. User Id and Password must be filled in.
If you forgot your hotkey combination, the simplest way to get into the program again is to re-run the setup file which will reset the stealth flag but keep the rest of the settings intact.
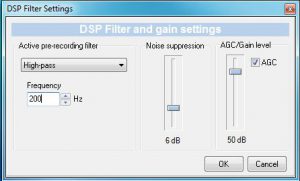
Enable AGC (File/Options/Audio/Input level amplifier) and set the level to 50-60 dB.
Use a filter (High Pass – 200 Hz) in the advanced filter settings dialog to dampen low frequency noise and hum.
The trigger sensitivity (front GUI) is typical a value between 0-200 ms.
Record a noise profile (the blue button at the front GUI).
Check the “Only on trigger” if you want to record the sound without filtering and only use the filter when triggering, by using this option it is possible to filter harder during trigger without affecting recording quality.

❓ Problem
Snooper reacts slowly to sound, misses peaks, or recordings start too late.
💡 Cause
Many modern laptops (especially Dell XPS 15, but also HP, Lenovo, ASUS, etc.) include audio enhancement software such as:
- Waves MaxxAudio
- Dolby Audio
- Bang & Olufsen Audio
- Nahimic / AI Noise Cancelation
These tools are designed for voice calls and media playback — not for accurate recording.
They often apply:
- Noise suppression
- Automatic gain control (AGC)
- Dynamic compression
- Signal smoothing
👉 This causes delayed or inaccurate audio detection.
⚠️ Symptoms
- Slow or delayed peak levels
- Missed triggers (sound not detected)
- Audio levels that “ramp up” instead of reacting instantly
- Inconsistent recording start times
✅ Solution
1. Disable or uninstall audio enhancement software
Examples:
- Waves MaxxAudio (Dell)
- Dolby / Smart Audio (Lenovo)
- Bang & Olufsen (HP)
- Nahimic / AI audio (ASUS/MSI)
👉 On some systems, uninstalling is required for full effect.
2. Disable Windows audio enhancements
Go to:
Sound Settings → Recording Device → Properties
Turn OFF:
- Audio enhancements
- Noise suppression
- Automatic gain control (AGC)
3. Enable exclusive mode (optional)
- Allows Snooper to bypass system processing
4. Test your setup
Make a short, sharp sound (like a clap):
- ✅ Instant peak → correct setup
- ❌ Slow response → processing still active
🧠 Why this matters
Snooper relies on fast and accurate peak detection.
Audio enhancement software modifies the signal and introduces delays, which can interfere with:
- Sound activation
- Noise gate behavior
- Recording accuracy
🔧 Tip
If problems persist, try a USB audio interface — these typically provide clean, unprocessed input.
✔️ Summary
For best performance:
Use a clean, unprocessed audio signal without enhancements.
- Go to Windows Settings/Personalization/Taskbar
- Click “Turn system icons on or off”
- Set microphone slider to Off.
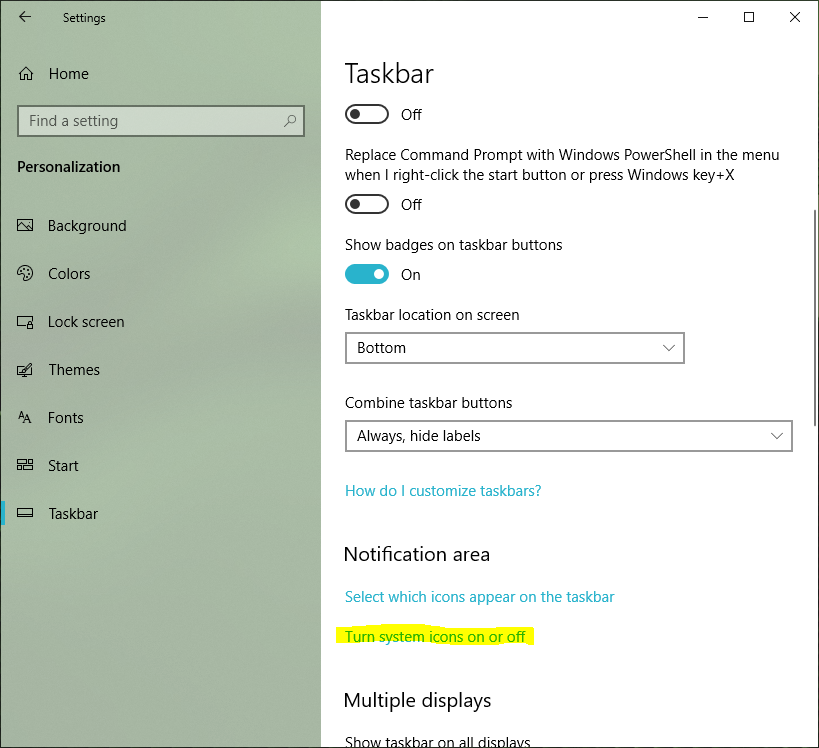
Taskbar settings
Microphone tray icon off
