
The Data Integrity plugin automatically creates an identity file containing creation information and hash (fingerprint) values of the recording. The identity file is digitally signed with an user specified private key. All recordings can later be verified for data integrity and detected if tampered with.
The overall intent of any data integrity technique is the same:
ensure data is recorded exactly as intended and upon later retrieval,
ensure the data is the same as it was when it was originally recorded.
In short, data integrity aims to prevent unintentional changes to information. – Wikipedia.
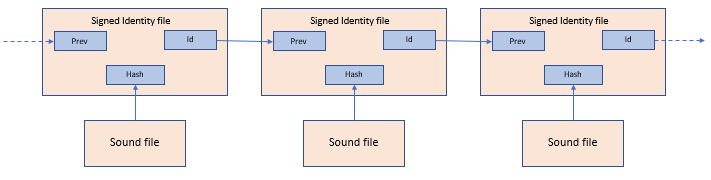
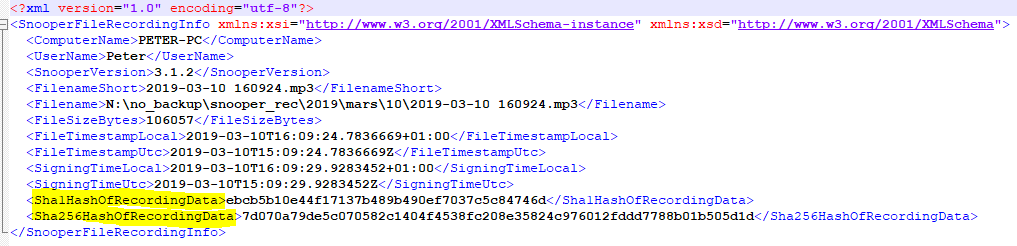
Snooper identity files
The Data Integrity plugin calculates a hash value of the finished recording and then stores the hash in a signed identity file with a file extension of “.id.xml.sig”. Every identity file contains detailed information about the recorded file and the computer environment. The identity file also contains a reference to the previous recording, this will give a chain of recordings where deletion or corruption of files can be revealed.
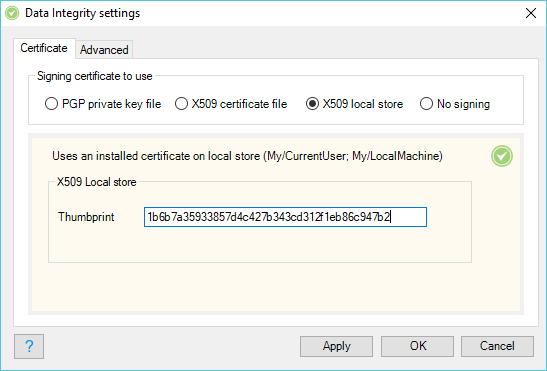
Signing certificate
Add your certificate (PGP, X509 or none):
- Load your PGP private key file, select the key-id and supply the password.
- Load your X509 .pfx file and supply the password.
- Load the X509 certificate from the local certificate store with reference to the thumbprint.
- Use “No signing” if signing of the identity file is unnecessary. This makes the chain of recordings not tamper proof, but good enough for simple check of data corruption.
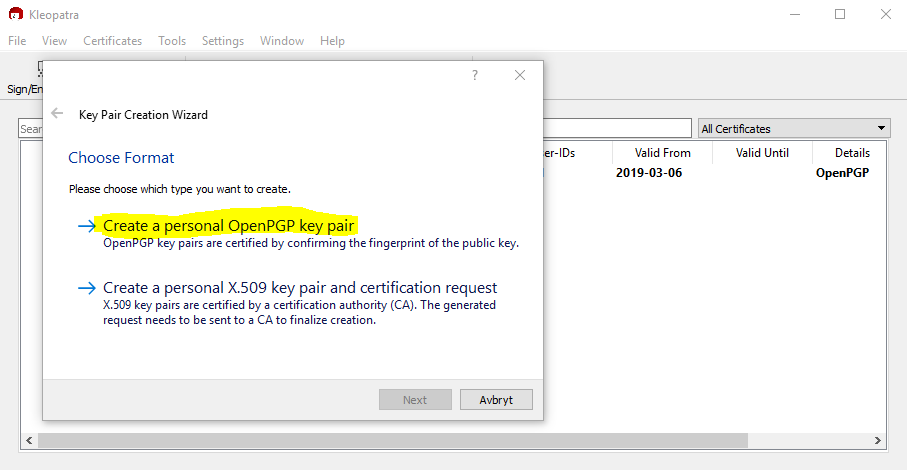
Generating a new certificate file (PGP)
Download Gpg4win or similar PGP program to generate and manage the PGP keys used for signing and validation.
Start the Kleopatra program and select File/New Key Pair…
Continue the wizard and then mark your newly generated PGP key and right-click and select “Export Secret Keys…” and export the private key as a file.
Select the exported file in the Snooper Professional Data Integrity plugin and make the plugin active to start signing your recordings.
Generate a self-signed X509 certificate
Open a power shell command prompt and enter:
New-SelfSignedCertificate -FriendlyName "My Name cert" -Subject "CN=My Name" -Type Custom -KeyUsage DigitalSignature -KeyUsageProperty All -KeyAlgorithm RSA -KeyLength 2048 -KeyExportPolicy "Exportable" -TextExtension @("2.5.29.37={text}1.3.6.1.4.1.311.10.12.1", "2.5.29.19={text}CA=1&pathlength=3") -CertStoreLocation "Cert:\CurrentUser\My" -NotAfter (Get-Date).AddYears(10)
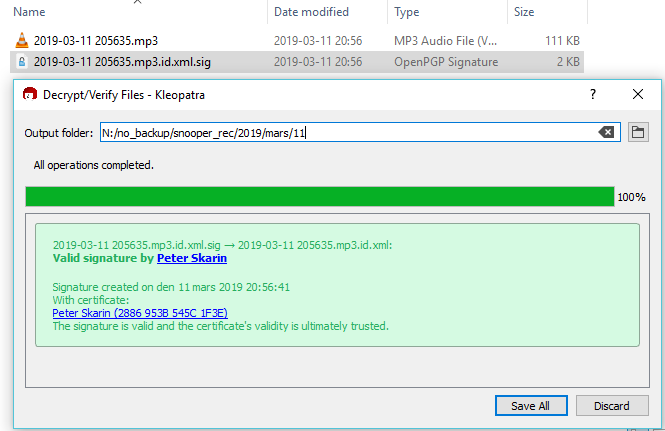
Validate a signed identity file
If you have installed Gpg4win verify the signature by just double-click the identity file that has a .sig file extension from Windows explorer and save the result.
Validate file hash values
View the saved .id.xml file and locate the hash values and use that for validation of the audio recording.
File checksum tools
To calculate the hash of the recording use online tools or download some free hash calculation program from internet.